Category: Free Designs (Page 3 of 3)

Here you’ll find free designs for fun craft and sewing projects as well as the River Heritage Mystery Quilt patterns.
Image of Mystery Quilt Reveal

Firstly, many of  these free designs are pdf downloads in individual blog posts. You’ll discover a variety of crafting projects as well as a full mystery quilt pattern.

Free Designs in Wool, Fabric, and Thread

There’s a sunflower pillow made with wool, burlap, and lace. Another wool project is a winter candle “cozy” with a cotton fabric snowflake.

Additionally, you’ll find a number of punch needle embroidery ideas.

Moreover, there are Valentine’s Day projects that include both wool applique and punch needle designs.

One of the free designs is a miniature version of the “JOY” quilt pattern that you can use to decorate simple bags for Christmas gifting. It’s another way to use BOTH beautiful sides of fabric!

Finally, get all the blog posts and downloads for the River Heritage Mystery Quilt. Karla designed this quilt for her local guild, River Heritage Quilters’ Guild. It features blocks that depict life on and around the mighty Mississippi River. There are nine free block designs plus setting instructions with links to the next step at the bottom of each post.

Sweet Pumpkin Applique

Sweet pumpkin is in the air!

Autumn brings the best of pumpkin to our senses. You might have already enjoyed your favorite seasonal coffees. Maybe you’ve lit some sweet-scented candles. Are you anticipating that first bite of sweet pumpkin pie?

It’s true, this time of year, pumpkin touches almost all our senses. Now you can add the cozy touch of wool and the unique look of the combination of plaid, lace, and burlap to make your fall seasonal experience complete!

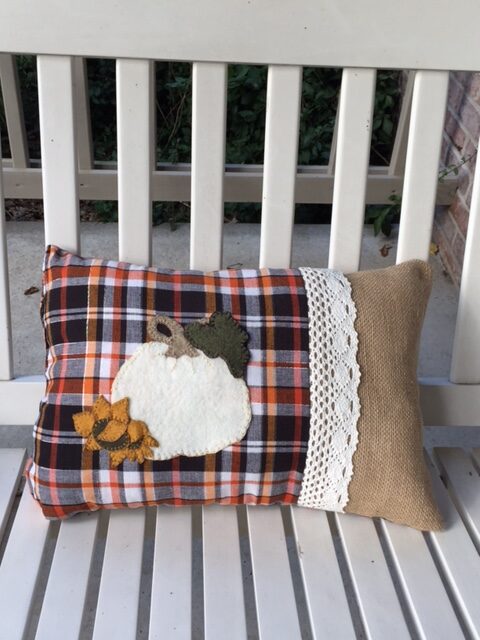
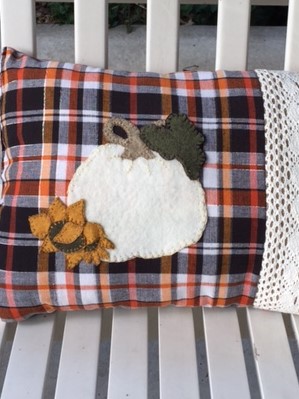
Here is the Sweet Pumpkin Applique pillow.

Sweet Pumpkin
Sweet Pumpkin Applique

First, download the free template here.

Use the template for your own pumpkin project or make the pillow as shown.

Sweet Pumpkin Applique

Accent Pillow Size: 12 x 17 inches

First, trace the template designs onto the paper side of fusible. Cut loosely around each. Press onto back of wool. Cut on lines.

Next, baste one 12-inch piece of 2 1/2-inch lace onto the left edge of 6 1/2 x 12-inch burlap. Pin, right sides together, one 11 x 12 inch plaid fabric and burlap together; stitch.

Then place applique pieces from back to front in order as listed and numbered: Pumpkin, Stem, Leaf, Small Sunflower Center (slip petal ends beneath center), Large Sunflower Center (slip petal ends 5, 6, 7, 8, and 9 beneath center; add petals 10 and 11 on top). Press to fuse pieces in place.

Hand stitch the wool applique using the blanket stitch and/or running stitch. I suggest these Valdani threads, size 8: Pumpkin: Easter; Stem: PT4; Leaf: P11 Aged Black; Sunflowers: P5.

Sweet Pumpkin Closeup

When handwork is complete, align and pin 12 x 17-inch backing with top, right sides together. Mark a 4-inch area for turning on fabric end of pillow. Machine stitch. Trim corners and turn. Use fingers to gently push out corners in burlap. Fill with small tuffs of polyester fill. Turn ends of opening inward and stitch.

Lastly, add a decorative blanket stitch (optional) across the end with a thick thread to make a nice edge.

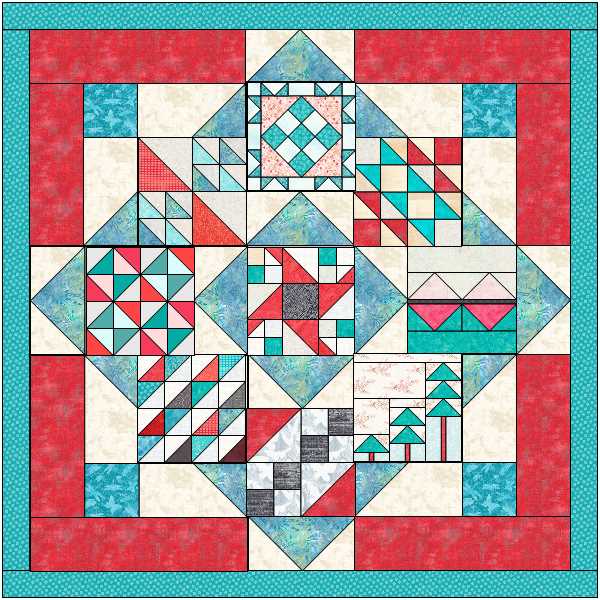
 Looking ahead to Christmas cheer, here’s JOYFUL, made with BOTH beautiful sides of fabric!

Image of MERRY
MERRY Quilt Pattern

Shop easily-use the blue Easy-Link Blue SHOP buttons HERE!

How to Put a Little Punch in Your Summer

Here’s a beachy punch needle design:

Creative Bee Studios

A Bit of Summer

Punch, in this case, is not a drink generally served at wedding and baby showers. I’m talking about sweet little punch needle-ette (new word)–tiny punch needle you can wear.

Small projects like this can be punched in one warm summer’s evening. Sit on the deck, the front porch swing, or in the coolest seat in your home and punch yourself a sweet little treat.

I wear my punched design as a necklace but you can also make key fobs or rings–even earrings. I have found various hardware at Hobby Lobby and Michael’s in the jewelry-making sections. There are even greater hardware options online.

creativebeestudios.com

Re-purposing Hardware for Punch Needle

The most important tip I have is to measure the inside diameter of your holder carefully and be sure your weaver’s cloth is secure and taut before you draw the outer perimeter onto your cloth.

creativebeestudios.com

The stretched diameter was larger than the pattern. Always hoop first, then draw on your design.


See this little bee? I drew the outer circle the correct size to fit its holder, but when I tightened my cloth in my hoop, the circle grew. I didn’t realize my mistake until I had completed the punch and realized it was too large for my holder. This little bee is now waiting for a new hive to come along.


For general instructions and a punch needle supply list, see my Punch Needle page.

Happy summer punching!


Sign up  and I’ll send you an email when my next post goes live, about once a week:

Please follow and share on Facebook and Twitter and pin to Pinterest. Thanks for following!

Newer posts »