Page 17 of 21

Colorful Wings – Three New Quilt Patterns

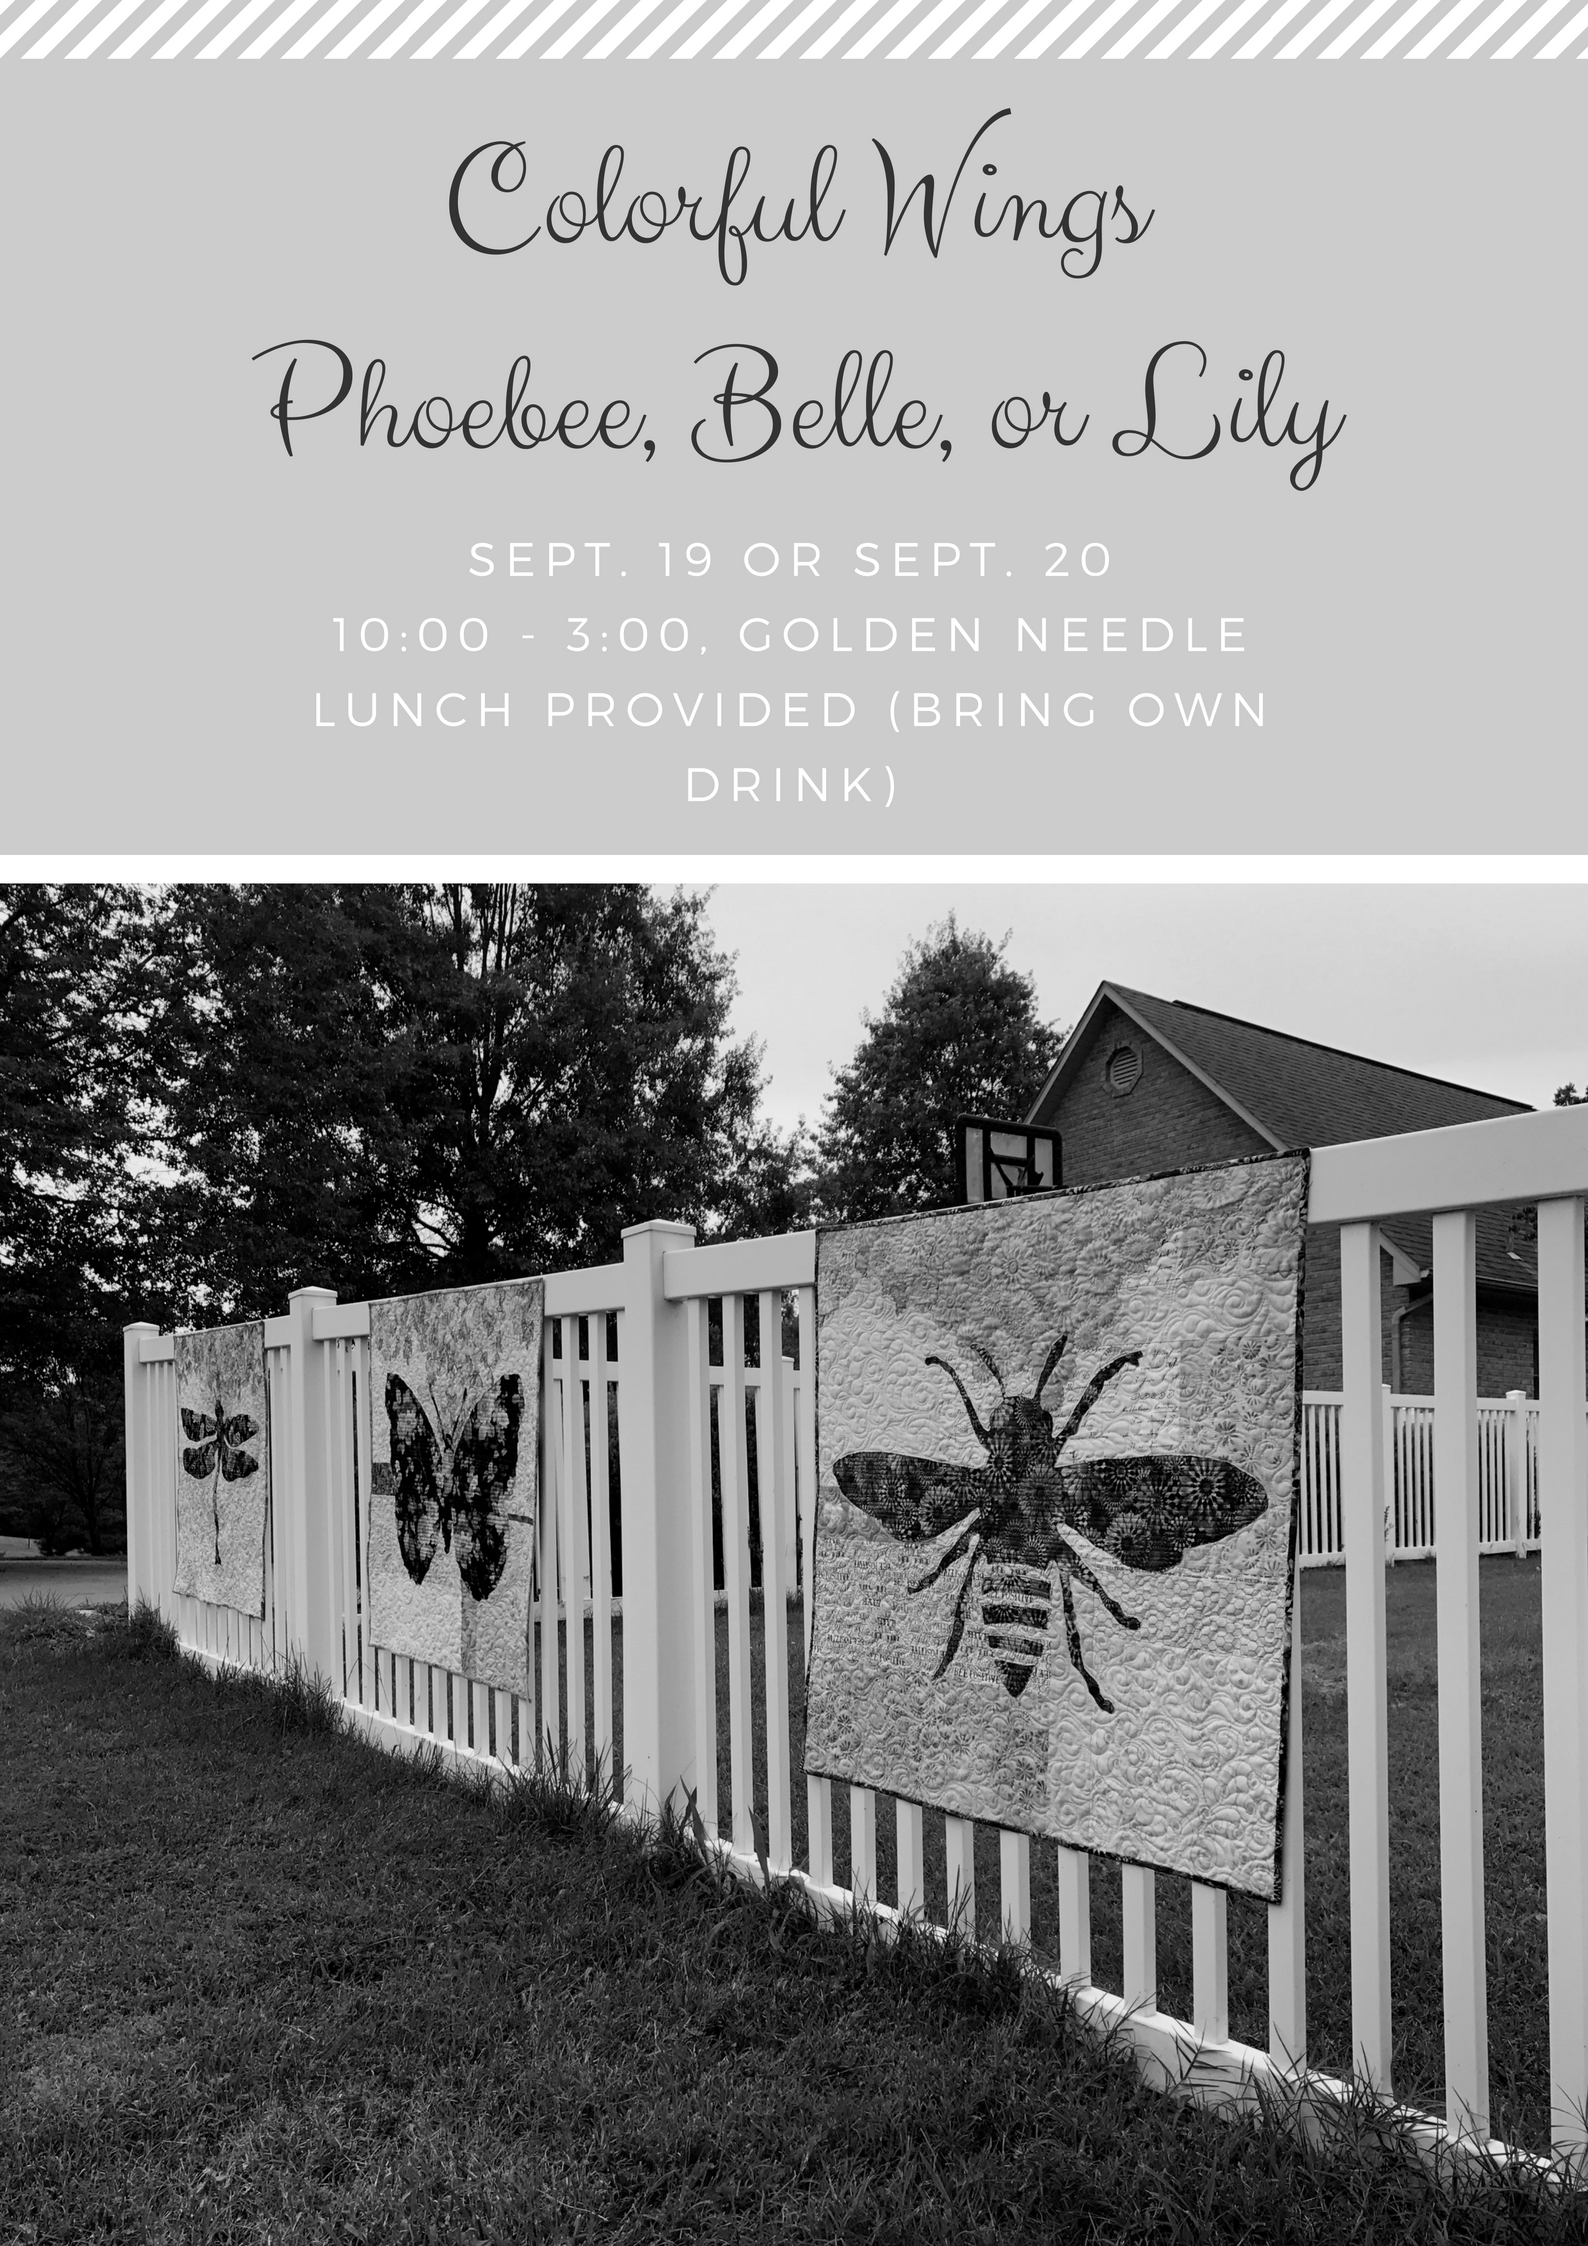
Introducing three quilt designs using BOTH sides of your focus fabric.

It all started with Phoebee (See Designing Quilts by Chance) and yardage of a Hoffmann Digital Spectrum print named Crystalia Rainbow.

Classes starting in September. Patterns available now.

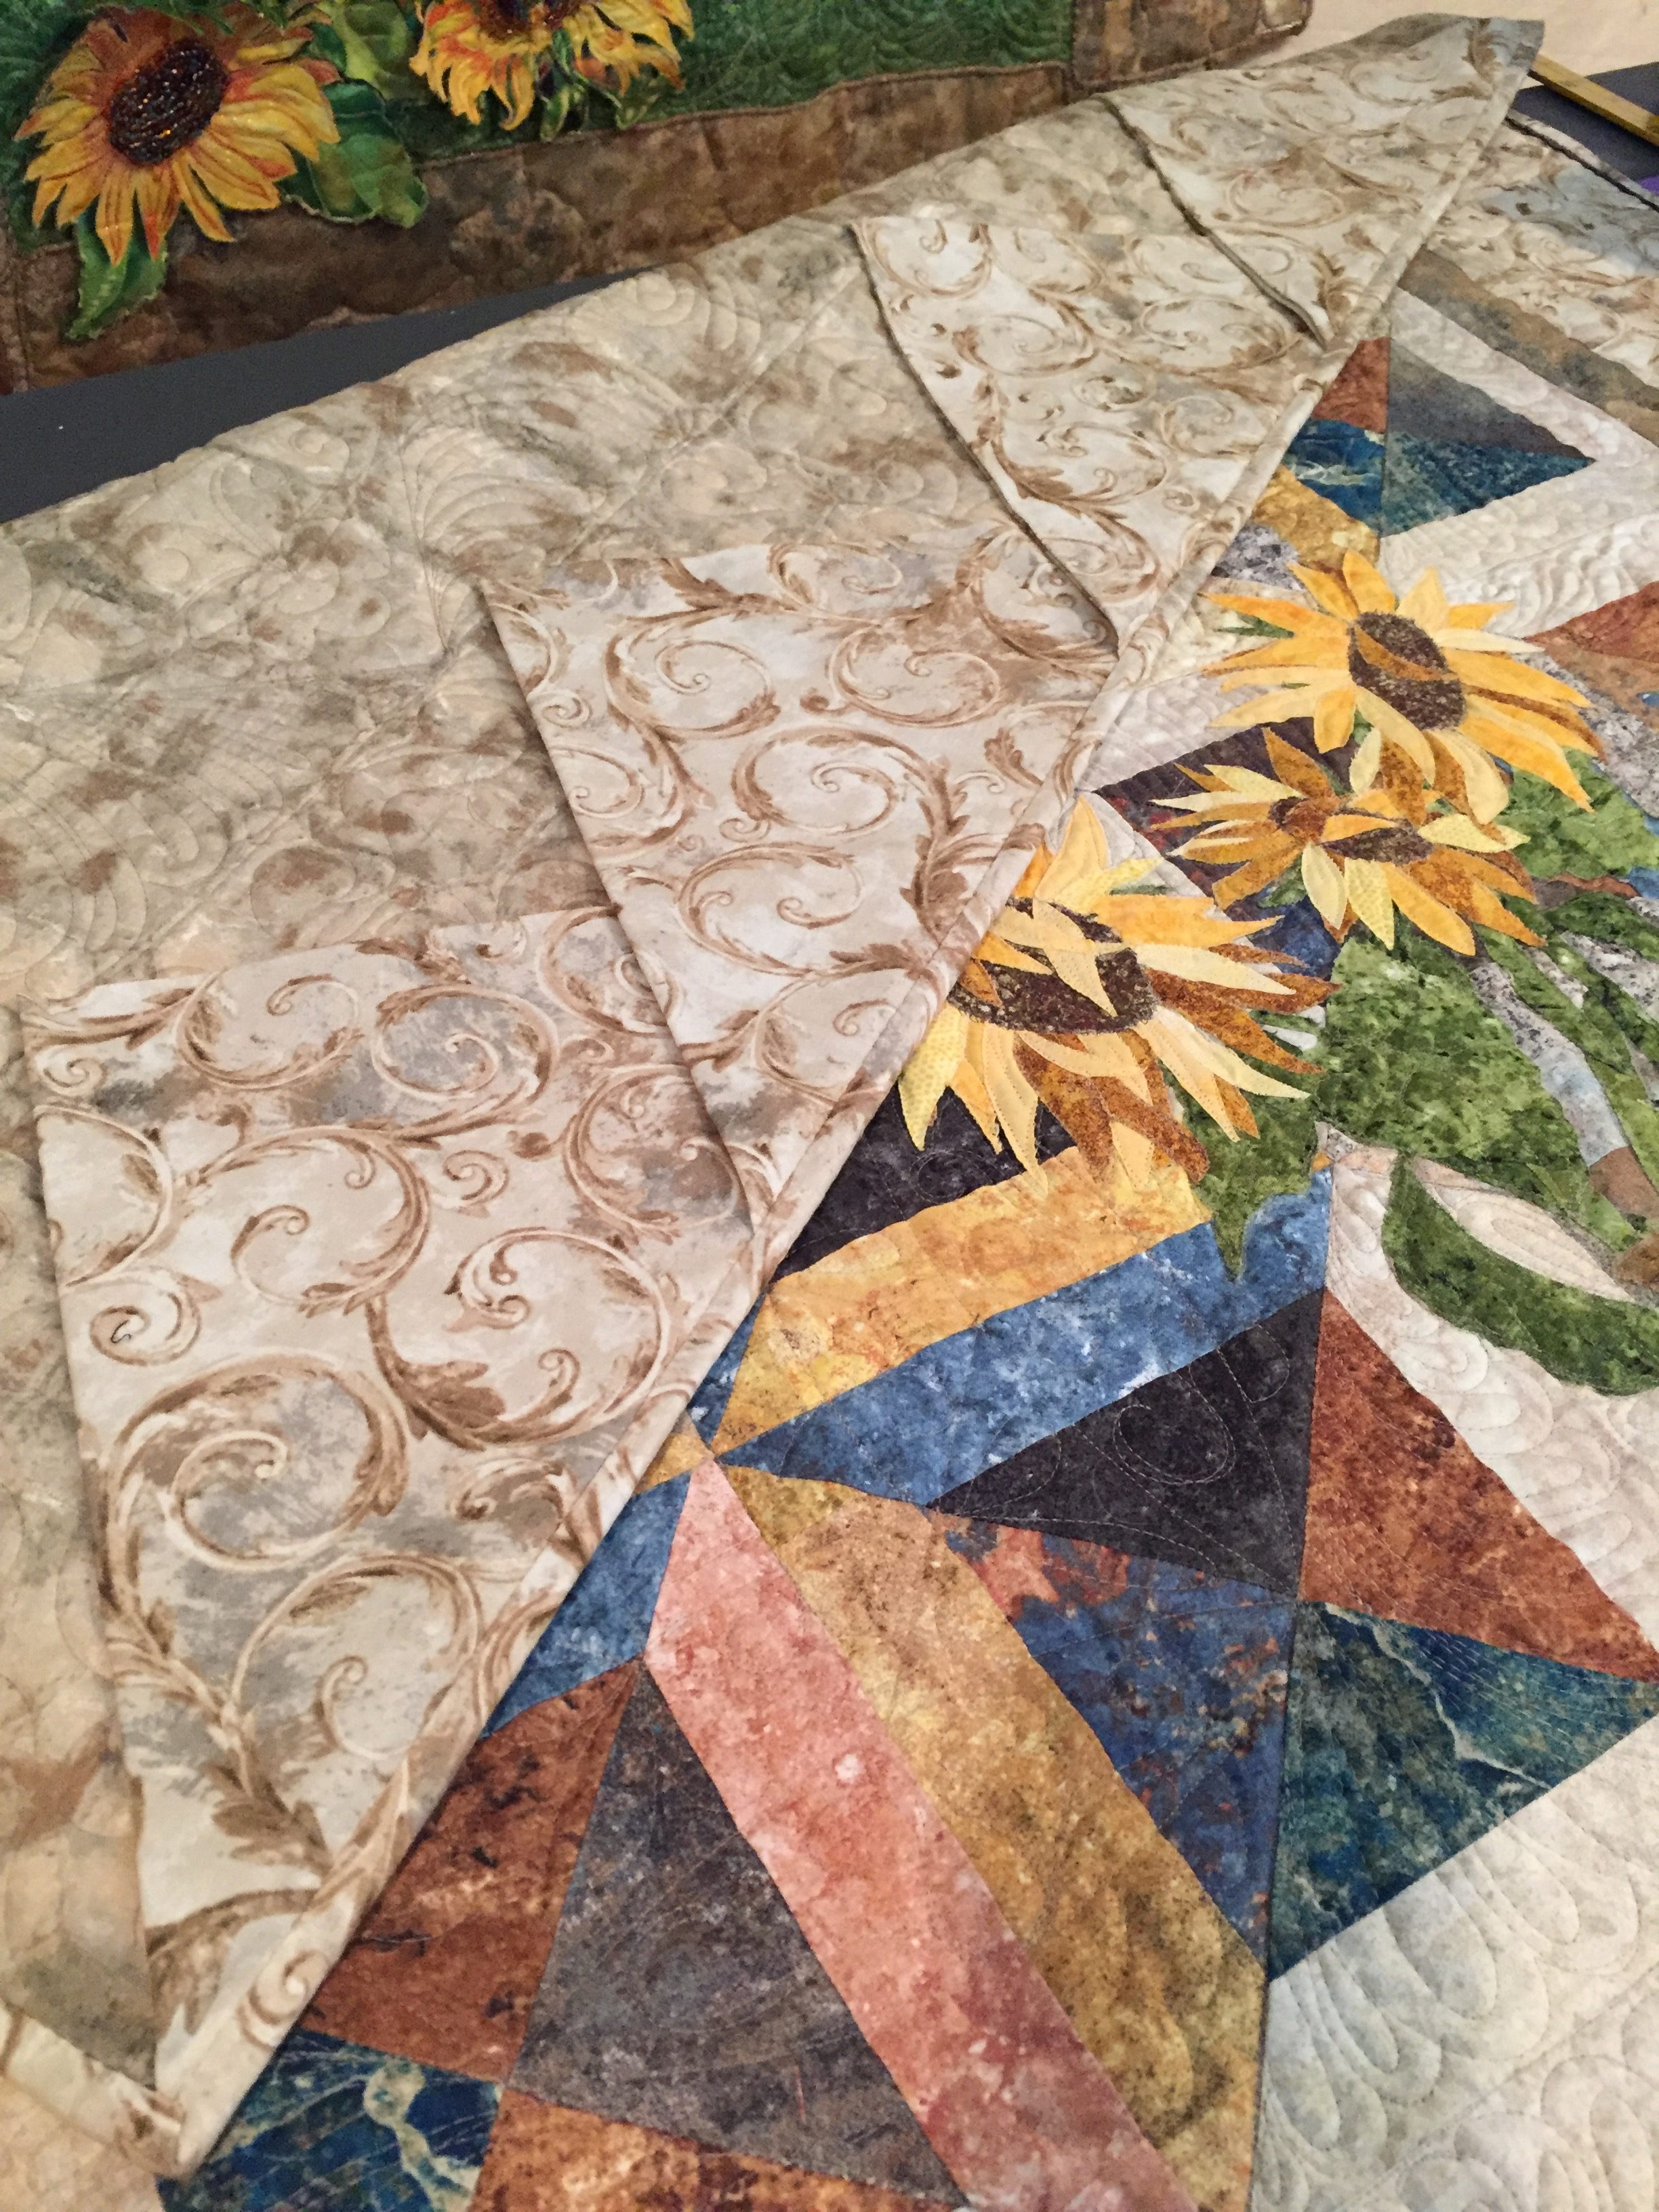
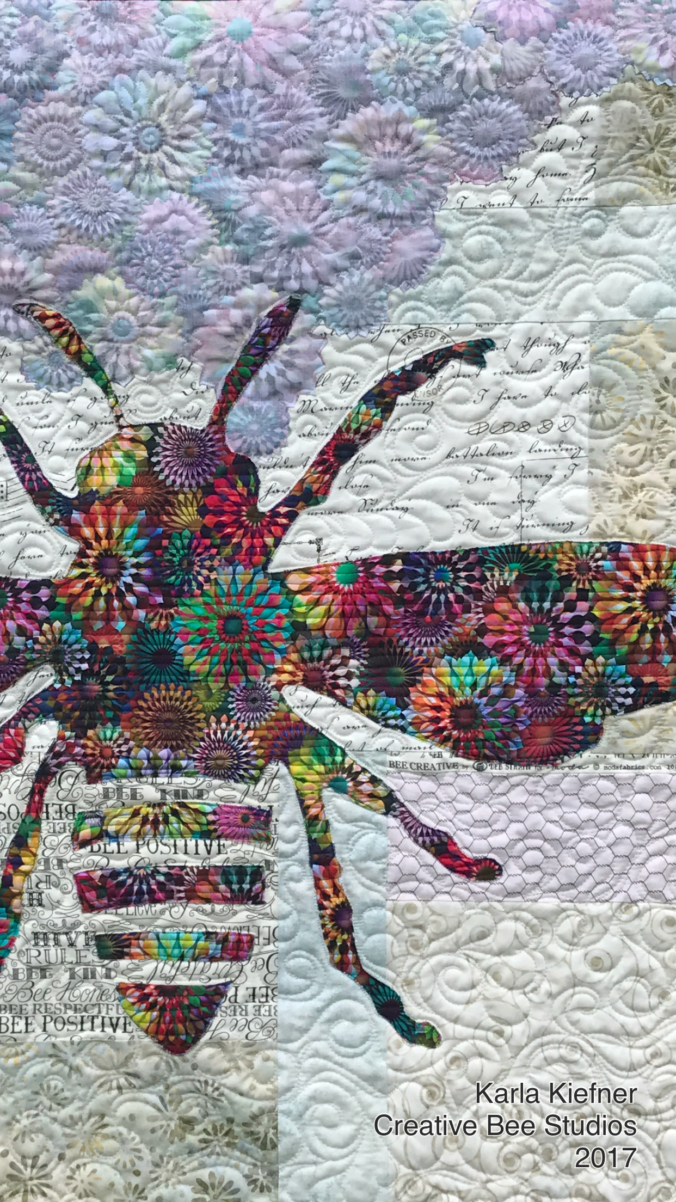
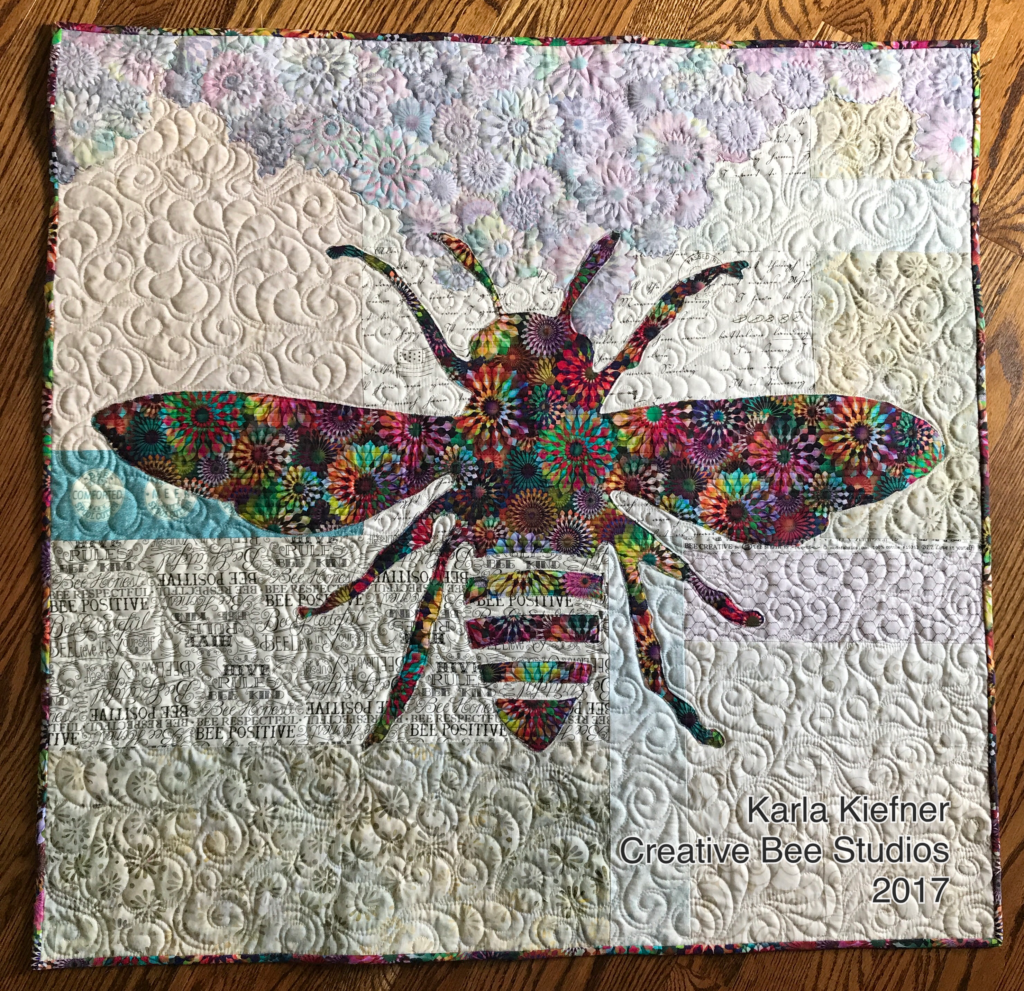
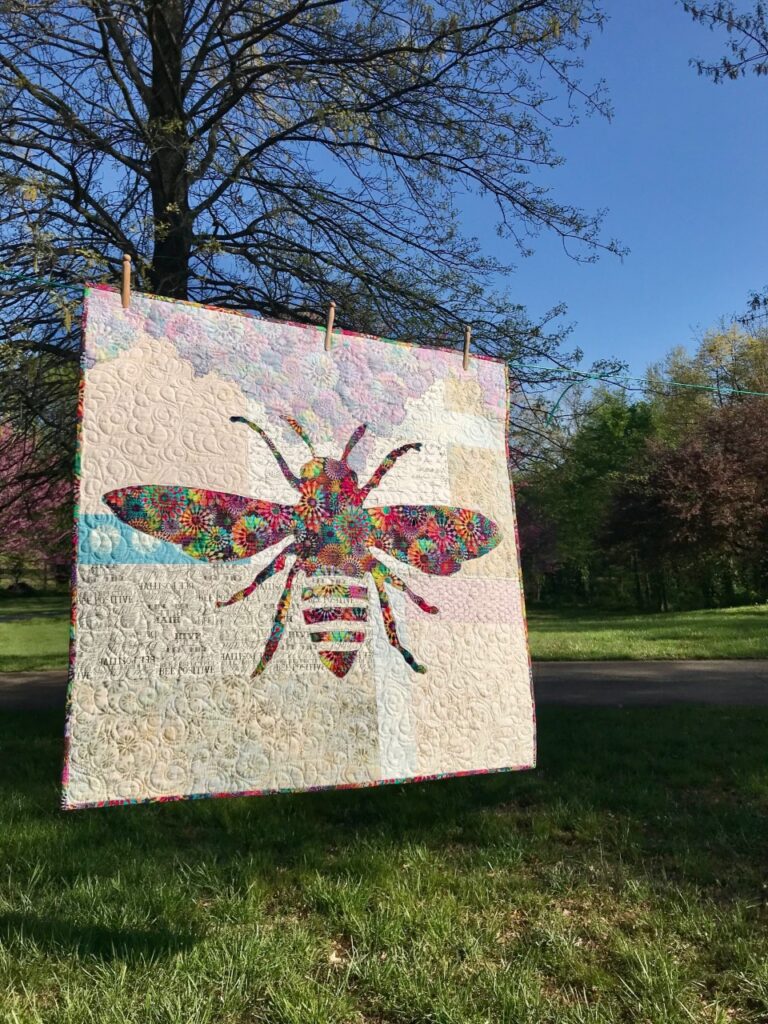
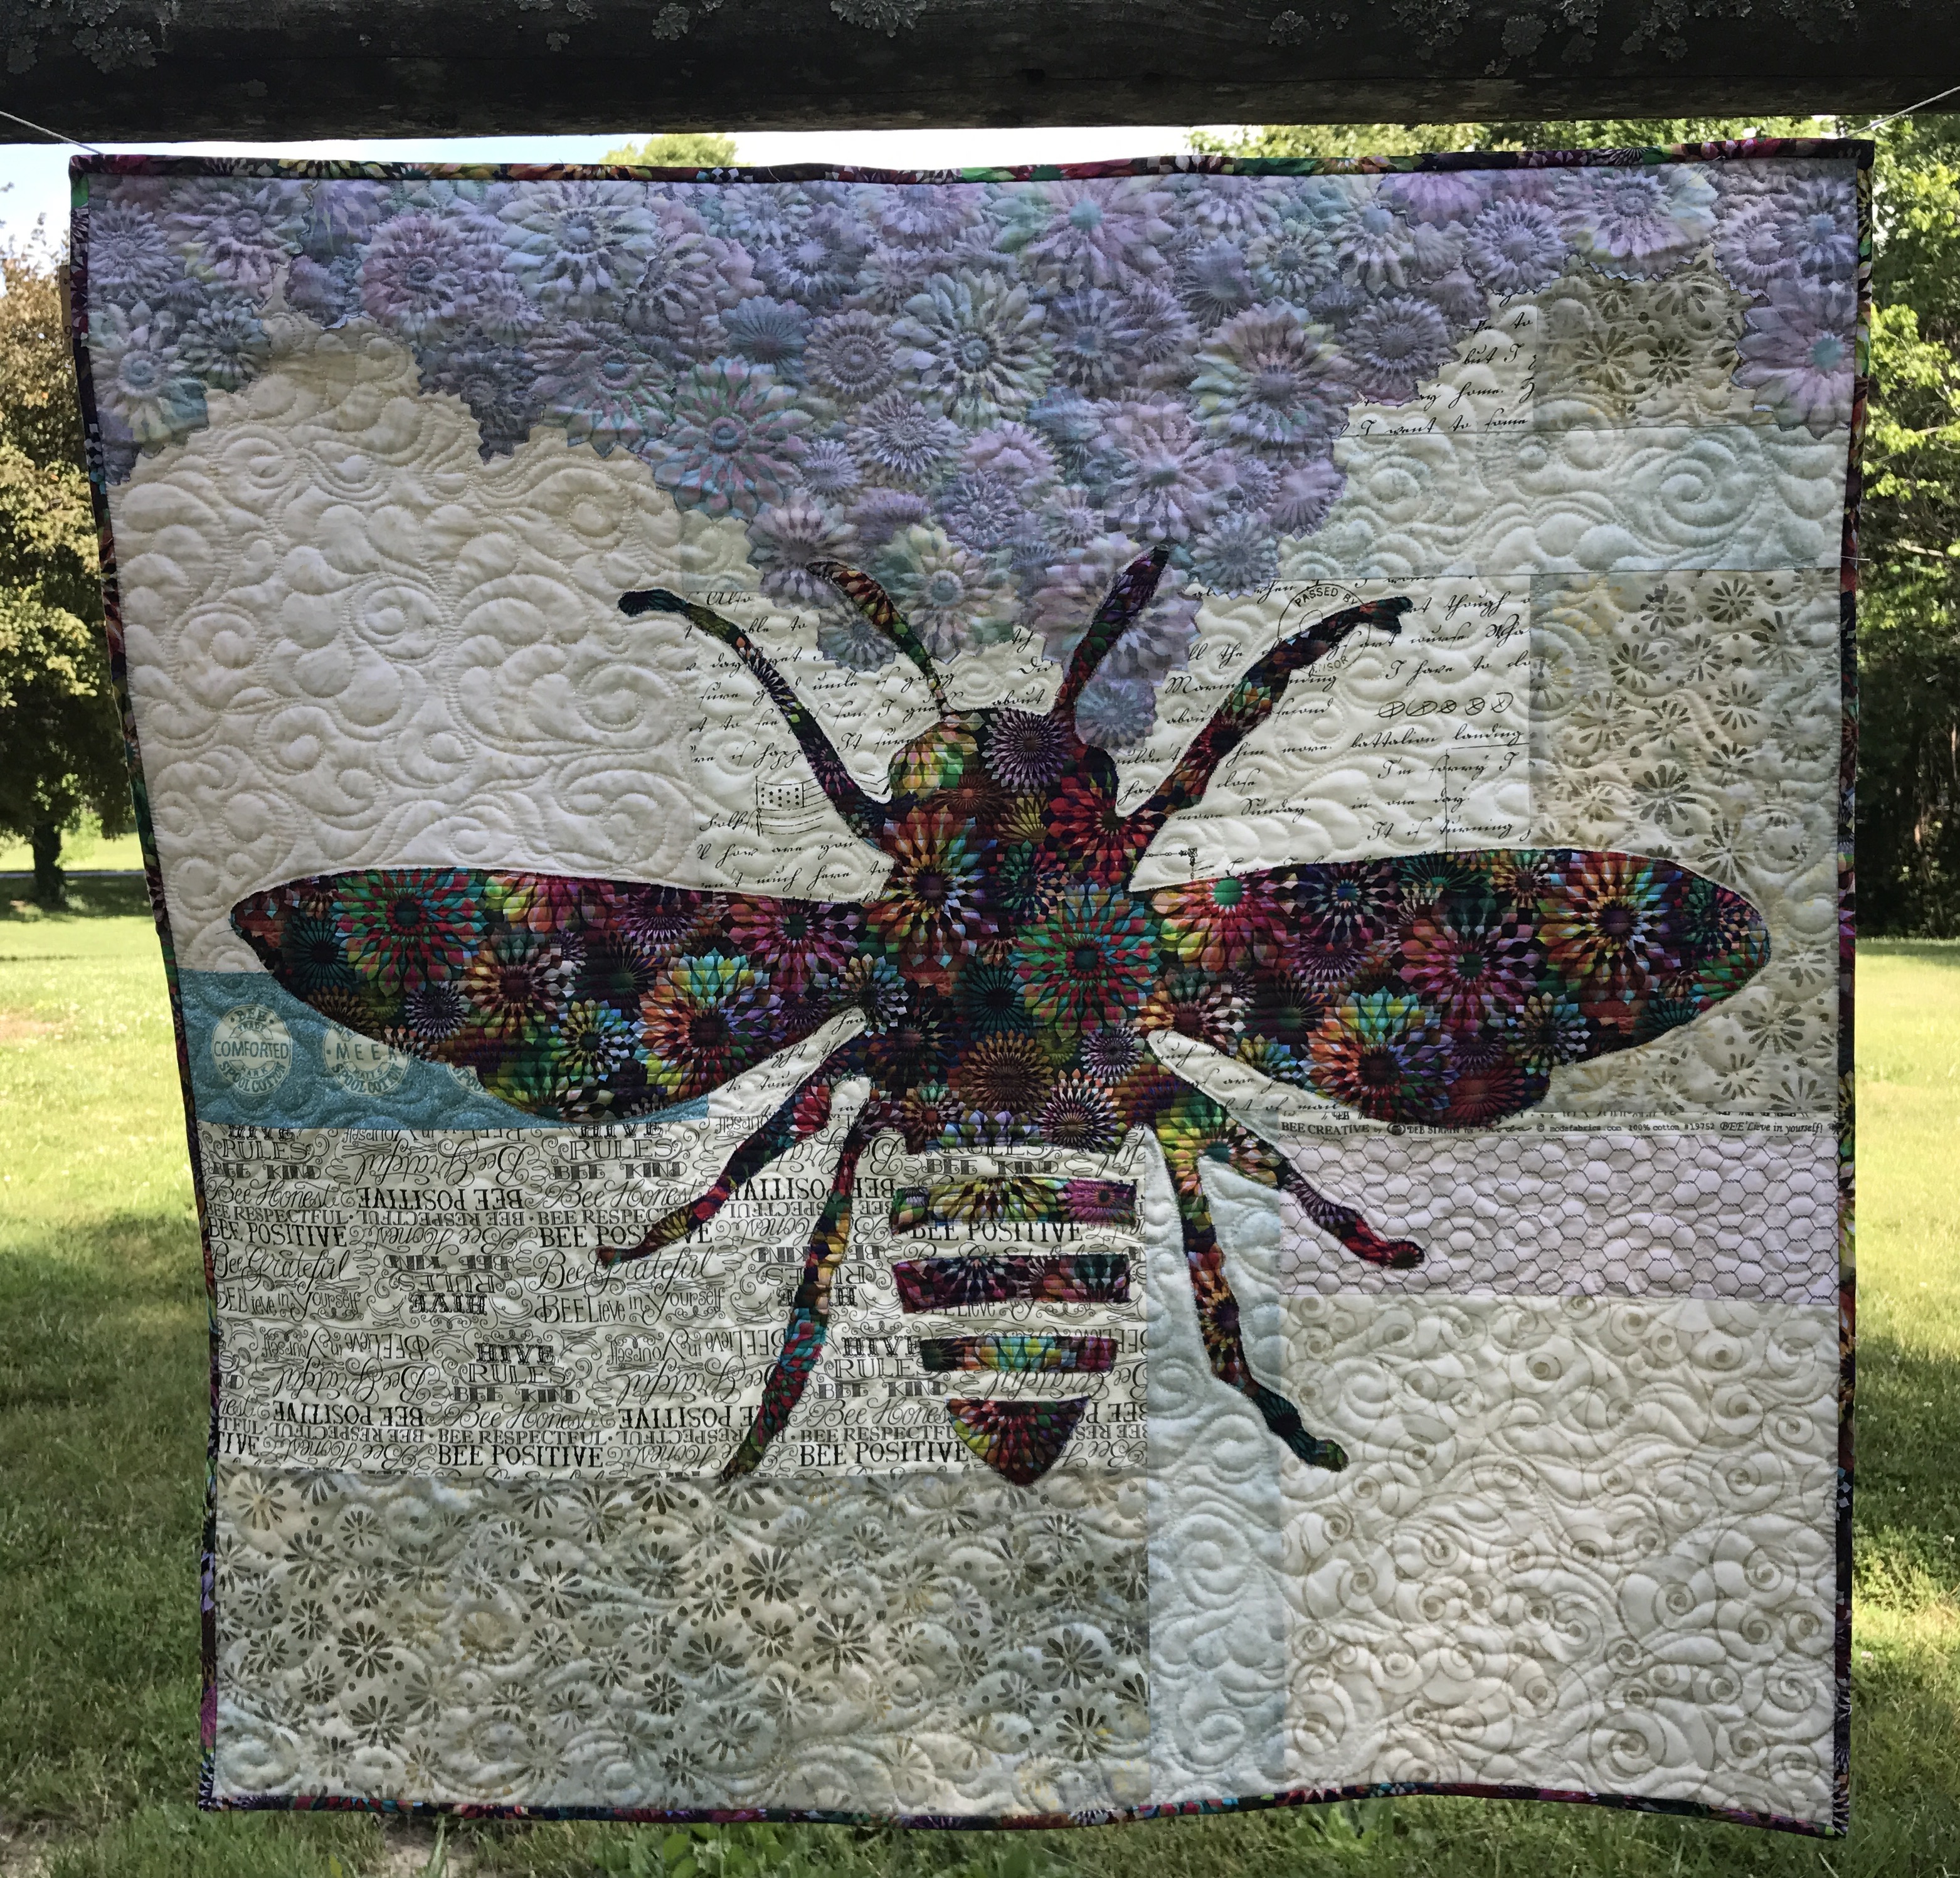
After being inspired at quilt market (See Six Favorites from Quilt Market), I knew I wanted to mix lots of different fabric types to make a bee quilt. While I thought the shape of the bee would be “in the mix”, the background is actually where I used a variety of styles of fabrics:

chicken wire fabric from the 90’s, inherited from my mother-in-law, Pat, (love)

modern word fabric,

batiks,

and pieces of selvage…

with a few accent strips of color.

Patterns available in my Etsy shop: https://www.etsy.com/shop/CreativeBeeStudios

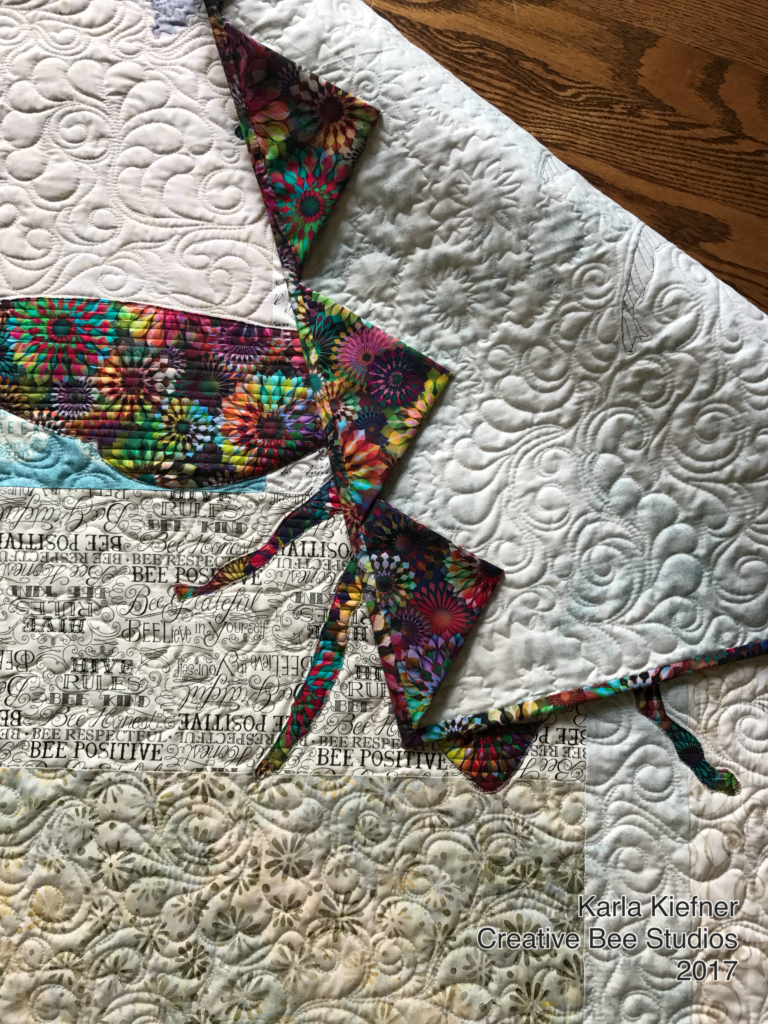
My Crystalia fabric became my bee. Her flowers I made from the “wrong” (such a harsh word) side of the same fabric.

I guess you could call the flower technique a “modern broderie perse” (thank you, Kelly). They are made with simple, fusible applique and are cut without fussing about the edges – in fact, I encourage letting background show through as it ties the two sides of the fabric together in the quilt.

In my classes and in my patterns, I point out that all reverse sides of fabric are not alike — audition your front AND back sides with your background fabrics.

The best way for me to describe a good reverse side is to say that it should “sing” just as much as the front, just with lesser value.

Image of Bee Quilt

Phoebee

One thing I liked most about Phoebee was that she seemed to be getting her life and beauty from the flowers. Thanks to the hubby for her name–which in Greek actually is spelled with two “e’s” at the end and means “bright, pure”.

Image of Class Flyer
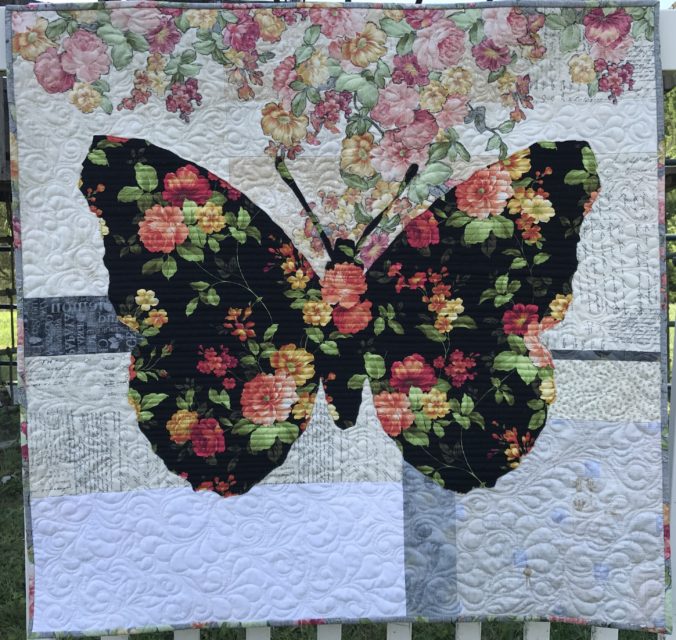
Next came Belle. She’s a French butterfly. Belle means “beautiful” (I NEVER got that about Beauty and the Beast – blush).

I found Belle’s fabric, Estate Gardens by Andover at my local quilt shop, The Golden Needle. I used similar neutrals in her background, but stayed with different shades of gray (some reversed) for the accent strips. Her binding is made with the reverse side out.

Note: I like to mix all shades of neutrals – white whites, beiges, off-whites- and all types of fabrics like tiny prints with batiks and novelties.

Image of butterfly quilt

Last but not least, meet Lily.

Lily is a sweet dragonfly made from Tree of Life fabric by Chong A Hwang for Timeless Treasures, also found at my local quilt shop.  Her background accent strips are in aqua because a) that’s my favorite color and b) I wanted to connect her to the water locales dragonflies love.Image of dragonfly quilt

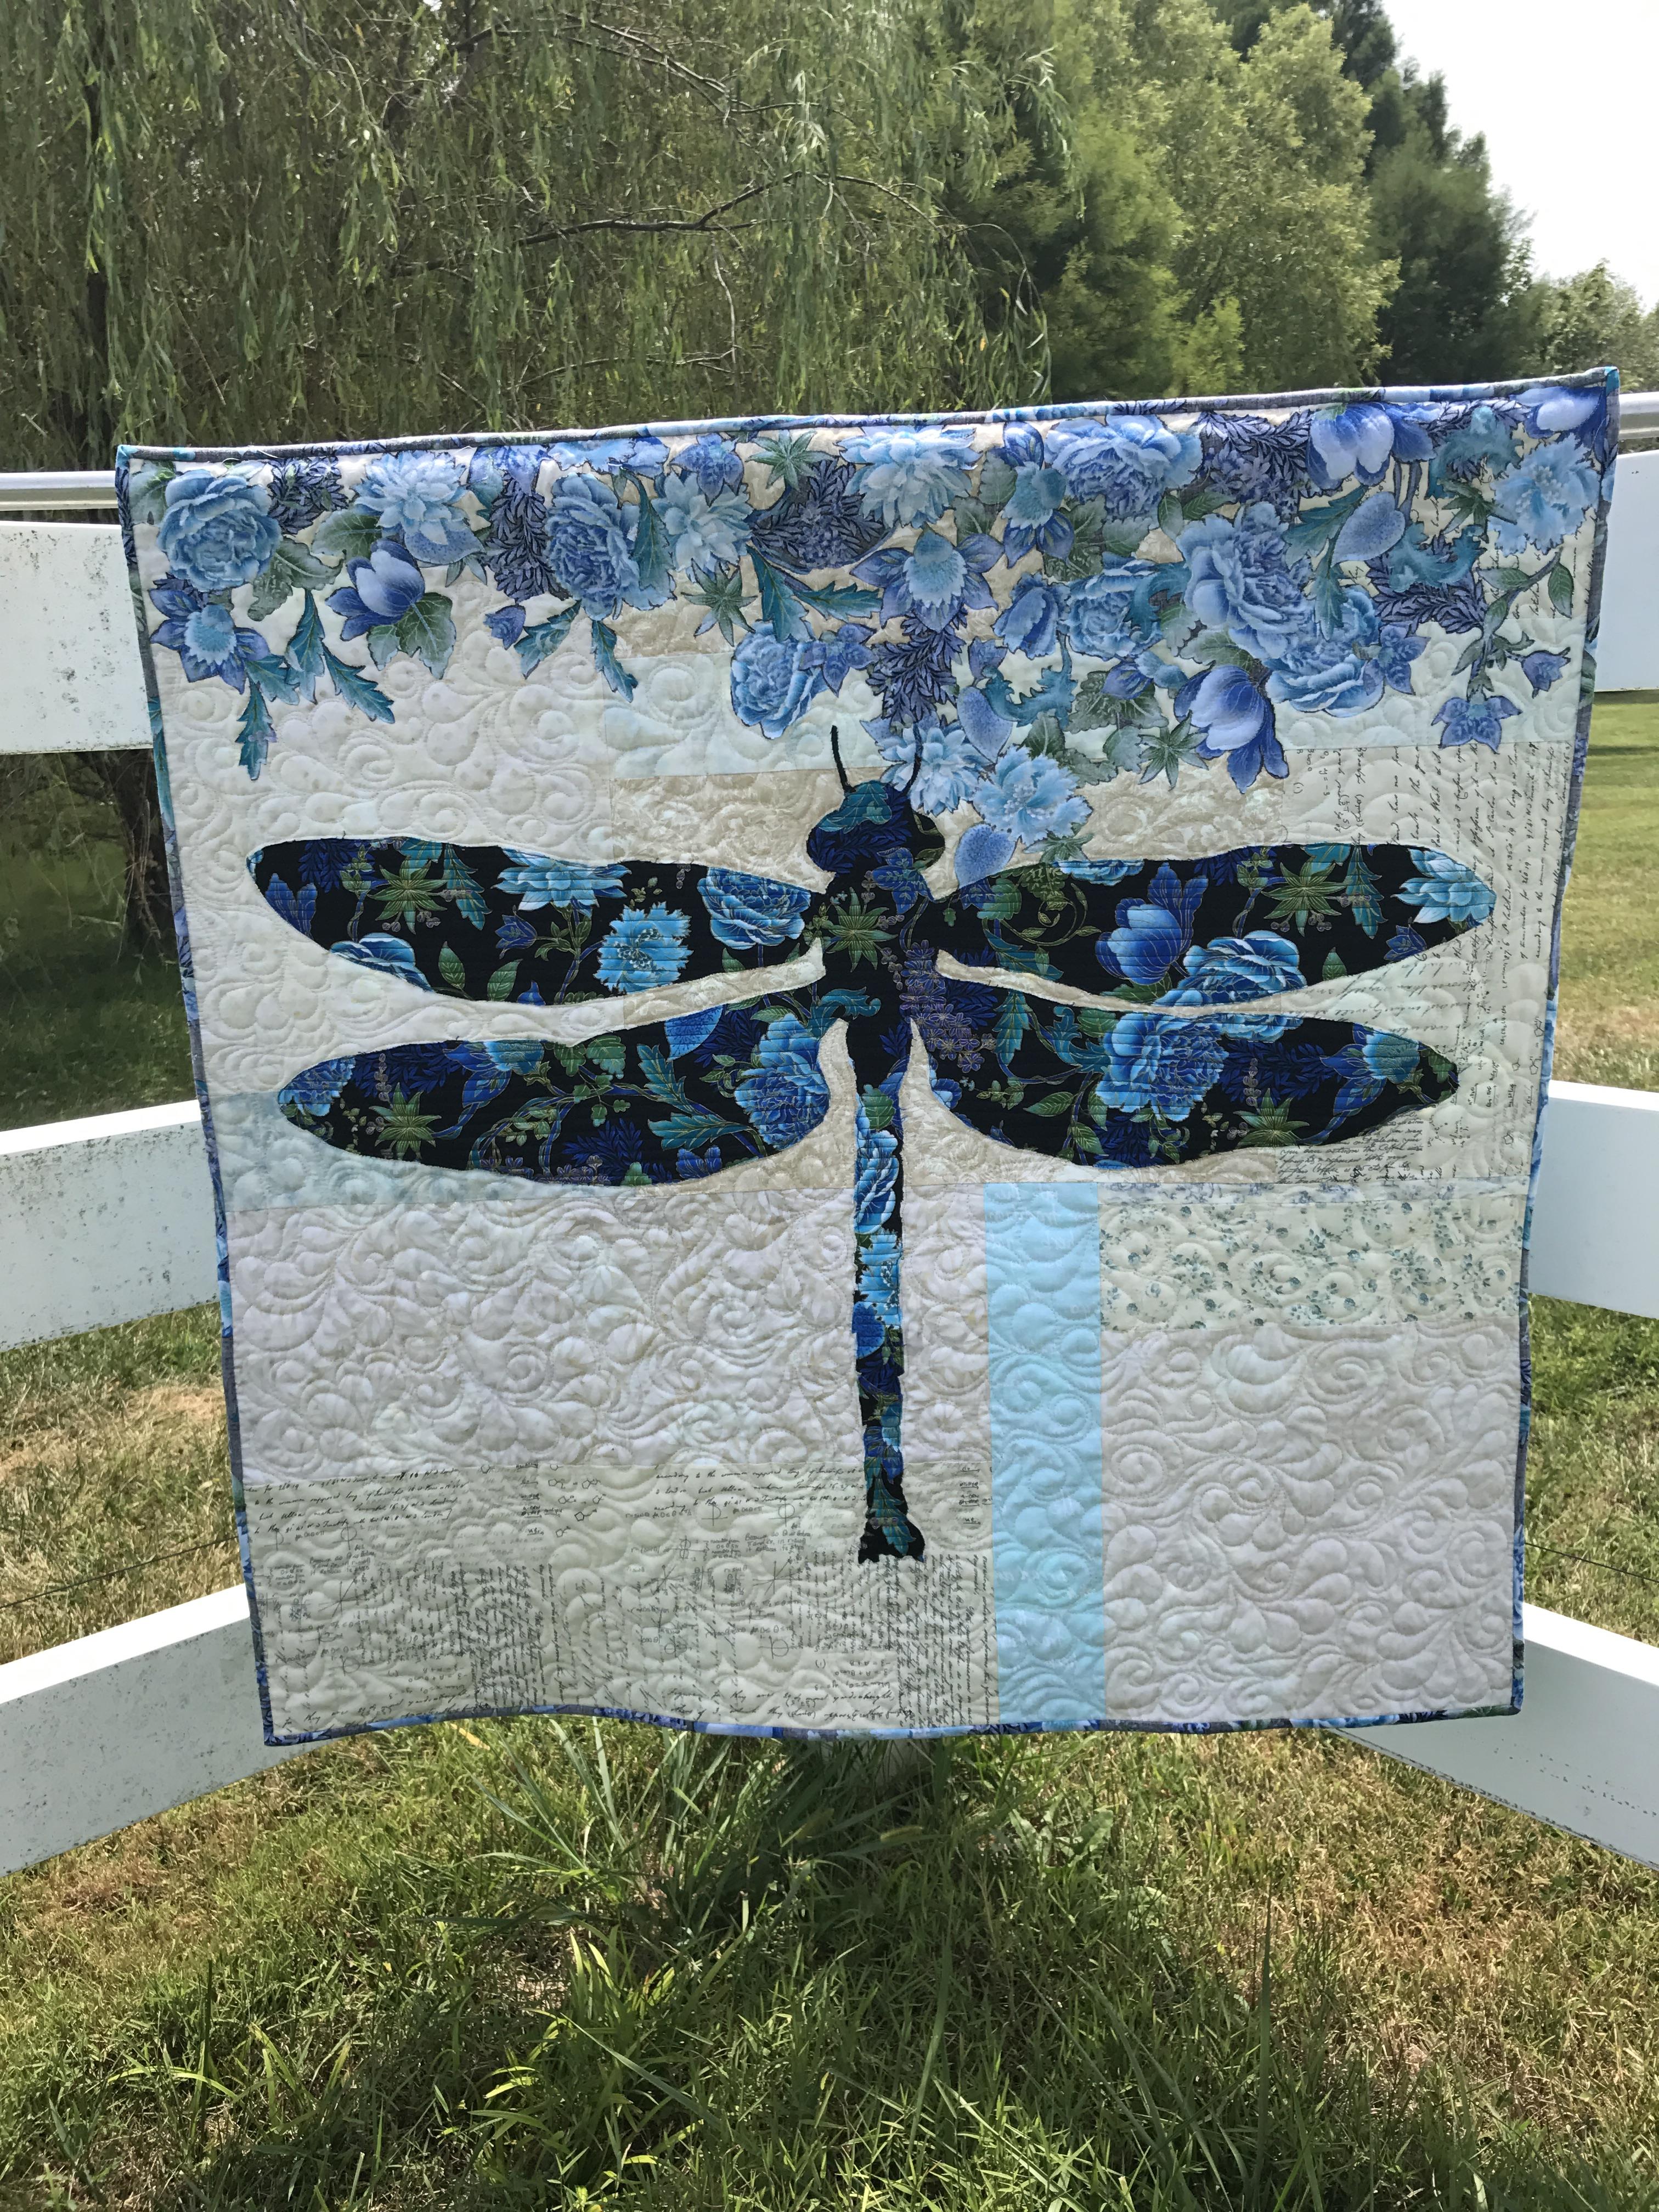
Visit my Etsy page or The Golden Needle for patterns. If you are interested in weekend or evening classes, let me know in the comments below.

Next up is a review of value, very helpful for auditioning fabrics for Colorful Wings quilts! Don’t miss a post – sign up below for email notification! Thanks so much for following.  Karla


Lickety-Split Quilt Binding

When time and cuteness matter, this Lickety-Split Quilt Binding is the binding for you!

The Lickety-Split Quilt Binding technique for finishing quilts is helpful, time-saving, and attractive. By nature, it aids in a more perfect machine-attached binding for your quilts. Here’s how:

The binding is made by combining two differing strips to make the binding. One acts as an accent that appears next to the quilt. The accent looks like a flange or piping along the edge of the binding. And, here’s the best part, the accent doubles as a stitching guide. You’ll attach your binding to the back of the quilt, turn it to the front and stitch in the ditch of the accent and binding fabrics. When you use a bobbin thread that matches your backing, your finished product has a clean stitching line along the edge of your quilt backing.

I originally saw this idea years ago on Pinterest. This method produced a wider binding than is generally used these days. I’ve adapted the idea several times to product a variety of sizes, based on your needs. I don’t consider Lickety-Split Quilt Binding for all my quilts, but there is definitely a time and a place for it! I’ve used this technique of binding numerous times.  It’s great for things like utility quilts, baby quilts (the ones which will be well-loved and get lots of use), seasonal quilts, table runners, etc. I’ve used it on several seasonal quilts, which see the light of day for about one month a year and therefore don’t need a hand-turned binding.

See Quilting Resolutions HERE for more!

Here is the original pin for this binding technique. I wish I knew who Susie was because I’d like to personally thank her for this binding idea!

The best part about this binding technique is the tiny burst of interest you achieve with the accent fabric. This strip gives your needle a perfect nesting spot for stitching it down by machine.

Lickety-Split Quilt Binding finishes at either two and one/fourth inches or 2 inches. I like the smaller size for smaller art quilts, table runners, and wall hangings.

Image of Lickety-Split Quilt Binding
Binding technique for when time and cuteness matter.

Cutting Guide:

2 1/4 inch binding:

Main binding  strip: 1 1/4″

Accent strip: 1 1/2″

2 inch binding:

Main binding strip: 1 1/8″

Accent strip:  1 3/8″

Simply cut your strips and sew them end to end and press like normal binding, but do it for both colors.

Then sew the two long strips together, press seam to the binding color.

With the seam facing down, align the edge of the binding along the edge of your quilt and stitch a 1/4 seam (or smaller than your final stitch seam), connecting the ends with your favorite method. Lastly turn your binding to the front of your quilt and stitch in the ditch between the two fabrics. I like to use a seam guide and move my needle to a comfortable spot.

Note: I have not used this method on show quilts or nicer quilts which call for a hand-turned binding.  I did notice at our last guild show that one of the quilts in the winner’s circle (triangle) had a machine-attached binding, so it’ll be interesting to see where the quilting world goes with this!

What’s your favorite binding method for fast quilts? Tell me in the comments below. Sign up below for notifications and you’ll never miss a post.

Stay tuned for some exciting news from Creative Bee Studios!

Trial by Combat – Quilt Competitions

Entering quilting competitions can be scary.

I’m guessing people who aren’t quilters might find that funny. Quilts are quilts – how can they be scary? I bet you’d agree though, if you quilt for family and friends or for your personal enjoyment, putting your heart and soul on display for a judge, strangers, and peers to see, pick apart, and make written comments on,  just might take the fun right out of those stitches and turn them into perfectionism and a bit of anxiety!

Mostly, I enter my local guild’s show which is held every other year. Easy enough. It’s a great show to be in because it’s fun to see what your quilting friends are up to and it’s always interesting to see how each show’s judging preferences change from year to year. I’m especially looking forward to our next show’s new category: Modern. Look here to see my study on defining modern quilting.

I did enter a quilt in a big show (AQS Chattanooga) a couple of years ago and the stress of entering that first time was high! I was terrified I’d do something wrong and miss getting in on a technicality of the process. I had chosen Chattanooga because it was a new location and I thought that would give me the best chances of getting in (I call that my Super Strategy). I guess it worked! I was super excited when I got the email that Bella Vista was accepted. My quilt was gonna be in a book (I thought)! When we got to Chattanooga, I found out they only make the pictorial books for Paducah shows (argh). I knew the quilt wasn’t “going anywhere” at that show because, well…I’ve been to these shows! The work is indescribable and well beyond my skills, knowledge, patience, and determination! But that was fine with me! Getting in was an honor and I had a great time wearing my contestant ribbon! If you’ve never been to a large regional show, GO! Every year I look at many of the quilts at AQS Paducah — no,  make that MOST of the quilts at AQS Paducah and just stand there and say, “How.” They are THAT good.

Image of Italian Landscape Quilt

Bella Vista was a semi-finalist in the AQS Chattanooga Quilt Show

So skip ahead to May of year 2017 and some emails I got saying, “Last chance to enter the NEW Fall Paducah quilt show… and, well, you know my Super Strategy is to enter into a new show, so I’m all in! Apparently, the strategy worked ’cause, GUESS WHAT?

Yep, guess who’s wearin’ a contestant ribbon at the Fall Paducah Quilt Show?   Moi! And here she is:Image of Quilt Depicting HeavenSee Sometimes You  Gotta Look Up.

Again, I say, if you haven’t been to a big quilt show, you should go because you will see amazing works of art which will make you stand there with your mouth wide open while you think, “HOW”.

If you haven’t entered quilts in a show, give it a shot! You just never know!

Scroll down to sign up follow my with email notifications!

Tell me what quilt shows you like and what your favorite thing is to see!

Please share, pin, and tweet away! Thanks, Karla

Summer Quilting

Summer-themed quilts are one of my four favorite seasons to quilt!

I really don’t have anything against the other seasons…but summer is my absolute fave! Maybe it’s because I grew up camping and water-skiing all summer long, every weekend from Memorial Day to Labor Day then for two weeks at Table Rock Lake. My friend, Annette, and I would go from one dad to another to beg him to ski us until we wore one of them down. The memories I have of sliding across the lake water, singing “Summer Breeze” at the top of our lungs while we’d double-skied are unforgettable. We’d love to go first thing in the morning before any ski boats were out but the fishermen were well in their coves, when the water was as smooth as glass.  It was only this year, when I was reminiscing with my 90 year-old  dad, that I realized that all those times they said their boats weren’t working they were just trying to move us along!

Image of Quilt Near Pool

Water Colours

When I got a summer job, it was at a city pool — for eleven summers. I’d ride my bike across town to work, starting as a “bag girl”, teaching swimming lessons, becoming a life guard and eventually the manager.  I had a pretty darn good whistle twirl, I’m telling ya! My friend, Patti, and I had the magical “Summer of Grease” and went through countless coins at the concession stand and at least three swim suits a summer from the hours we spent there almost everyday. The quilt above uses a background fabric which looks like the bottom of the pool when you’re swimming laps and the sun is shining. I just love it!

Image of Quick Trip Quilt

Tropical Trip/Quick Trip by Eleanor Burns

As a mom, I always loved when the kids got out of school for summer and never understood why people wanted summer to end and school to begin. I just have a thing for summer, sunshine, warmth, and water, I guess.

So I guess it’s not too surprising that summer shows up often in my quilts. When we get to vacation at the beach, I take my quilts for photographing and my Featherweight for sewing. See Pensacola Dreamin’  for more quilting at the beach!

Image of Featherweight Machine with Beach Background

Vintage at the Beach

Image of Bright Potato Chip Quilt

Jacq’s Potato Chip Quilt

I believe there is nothing like water in the background to make a quilt sparkle.

Image of Instant Bargello Quilt

Seaside Dreamin’/Instant Bargello Quilts by Susan Kisro

Do you like to certain projects in the hot summertime? Tell me how you spend your summer stitching time. Comment below.

Some exciting things are happening with Phoebee (click here) and Belle (partially shown here)  — stayed tuned!

Don’t miss a post! Sign up for  email notification and you’ll know when a post goes live (about once a week). Thanks for following!

Hang Quilts Using Prairie Points

Use pretty prairie points and just a couple of hand-stitches to hang your quilts.

The Prairie Point Hanging Method is as easy as 1, 2, 3…4 stitches!

1. Fold and press fabric squares diagonally, twice, just like you would when making prairie points.

2. Pin the raw edge of the prairie points (triangles) at the top edge of the back of your quilt, spaced evenly.

3. Baste across the top of the quilt by machine and make four stitches by hand (with doubled thread) on the points of each triangle, making sure you only stitch through the backing and batting.


It’s EASY, FAST, and PRETTY! Click here to see this quilt.

Image of back of quilt with prairie points.

Prairie Points Hanging Method

Adjust the size and number of your squares based on the width of your quilt. For example:

My mini wall hanging uses four small, 4-inch squares. See this quilt in A Love Note from Johnny to June

Image of back of miniature quilt.

Miniature quilt hung with prairie points.

Four 7-inch squares make prairie points for a 24-inch wide hanging.

Four 16-inch squares work well for a 48-inch quilt and easily accommodates the largest requirements for our quilt show standards. Simply add more of the same size prairie points for a bed-size quilt.

Image of 48-inch quilt with prairie points.

Bella Piastrella with Prairie Points Hanging Method


TIP: For small wall hangings, use an even number of prairie points and you can hang your quilt from a single nail or hook instead of leveling it between two points.

How do you hang your quilts?  Share in the comment box below. 

Scroll down to sign up for email notification and you’ll get a notice when a new post goes live (about once a week).

Thanks for checking out by my blog. Please share, pin, and tell your friends!

From Trucking to Quilting

Writing a quilt blog from an old trucker’s desk.

My grandpa ran his whole cross-road trucking company from this tiny roll-top desk. It is from here that he wrote out his invoices, paid bills, signed contracts, and wrote paychecks.  I’m told his drivers had to wait next to the desk while grandpa wrote out their paychecks. It is from this little desk that my grandpa supported Grandma Ruby and their twelve (yes, twelve) children.

There’s barely room for a laptop…of course, he figured in his head and on paper.  There are tiny drawers and slots.  What did they hold? They aren’t large enough to hold a piece of copy paper. I assume he had a 5 x 7 inch booklet of hand-written, carbon-copy invoices.Image of Old Desk

I remember this desk being in the “pink room” in the middle of the house on Walnut Street (which was formerly a funeral parlor). This desk was in the same room as the black rotary telephone and grandma’s large quilting frame. Grandma made lots of utility quilts from polyester (I got the one pictured for my graduation), but she also cross-stitched and pieced cotton quilts which were hand-quilted.

Image of Two Quilts

These are my wedding and graduation quilts from Grandma Ruby.

While she herself was unable to quilt this cross-stitched quilt she made for my wedding, I cherish it just the same. Do you think maybe her favorite color was pink?

The desk, stained dark brown, had numerous scratches on the outside– maybe  from moves? There  were also lots of scribbles on the sides which help me imagine the noise and activity that surrounded grandpa and grandma in a home with twelve children.

There’s a lock and key for the roll-top and what is really cool is that when the top is down, all three side drawers are locked by way of a piece of wood in the back of the drawers with three nails sticking out.  As the bottom of the roll-top moves upward to roll over the desk, it releases the piece of wood to lock the drawers in place.

Image of Refinished Desk

I refinished this desk with antique white chalk paint and a nutmeg antiquing.

I like to imagine it’s like something Nancy Drew would’ve used!

I’m so happy to have this desk and am honored to write this post from the little desk that supported a family of fourteen!Image of Desk Nameplate


Tell me about where you work. Do you have cherished family heirlooms in your home? Please comment below.

Sign up for email alerts when a new post goes live. Thanks for following!

Designing Quilts by Chance

In this quilt, I used the front AND reverse side of its focal fabric.

How do you design a quilt? Do you use graph paper and draw out the design with exact proportions? Do you use color pencils or do you label the drawn areas with the colors of fabric or values you’ll use? Do you use a quilt design software or a tablet quilt design app?

Yeah…not me.  A quilt often comes to life in my head… very vaguely, kind of like a mystery unfolding.  I ponder the idea until I start to pull fabrics from my stash and start cutting, drawing, and stitching. At least, that’s how Phoebee came to life.

Image of Quilt with Bee.

Phoebee was designed using both sides of a focal fabric.

Phoebee began with a vague idea to use pieced scraps from my stash for the background and use a bee as the main design. That’s about all I knew.  I thought I wanted to use multiple fabrics for the bee as well. I knew the shape I wanted to draw out for my bee, but I wanted to get my background set first for size.

I did use graph paper in my process, but it was after I stitched my pieces together and decided I liked the look. That’s when I wrote down the dimensions and drew the shapes out, labeling which fabrics I used. I used a pencil because my drawings and placement of fabric changed several times in the process.

Once I was happy with the background, I made all my notes and could hardly wait to grab fabrics to design the bee.

NOTE: I don’t clean up ANYthing while I’m in creating mode — I just let it flow and fabric is everywhere!

So here I was, sitting on my floor (because my design wall was {and still is, truth be told} full of a bed-size quilt in progress), trying out fabrics, figuring out how to combine them to make an interesting bee, when one fabric just kept jumping out at me. I finally gave in and decided to use it alone for my bee. That fabric looked really good against the pieced background.

But something was missing. I liked the bee. I liked the background. There needed to be another element – something of surprise or interest and something to “ground” the bee somehow. I moved the extra fabrics aside and accidentally turned the “bee (focal)  fabric” upside down — now THAT was interesting! To use the reverse side of the focal fabric for the flowers the bee was pollinating was exactly what this quilt needed to make sense, be unique, and complete the “story”.

Image of Full Quilt with Bee

Phoebee means bright, pure in Greek.

Phoebee means BRIGHT,  PURE in Greek and she is both! I happened to use a color-dense Hoffman Spectrum Digital floral print for the bee, the flowers and the binding, but any floral, big or small would work which makes this a great stash-busting quilt.

I like the idea that Phoebee is vibrant and the flowers are softer in value as the bee is getting its life from the flowers.

I’m excited to finish writing this pattern and I have hazy plans in my head brewing  of additional designs using pieced backgrounds and one floral focal fabric.

Image of Prairie Point Hanging Method

Prairie Point Quilt Hanging Method

Notice the Prairie Point Hanging Method (click here for details)

Sign up and get an email when my next post goes live!

For more information about free-hand stylized quilting, visit my The Quilting Bee page.

Discover How a Flange Can Enhance Your Quilt

Adding a flange to your quilt can add interest, color, and contrast.

A flange is a small strip of fabric, folded in half and attached by basting to the edge of a border, section, or even the final edge of a quilt.

While a flange doesn’t add to the size of your quilt, it can provide a pop of color or a “stopper” if needed. It can be helpful when planning the design of a quilt to add a flange if you don’t want to add a border or if you want to accent a section of the quilt.

It can also be useful to add a flange to an existing pattern. I did so here

Image of Quilt with Flange

This small flange helps the eye connect from the binding to the interior blocks of the quilt. Allietare pattern by Bonnie Hunter.

on my Allietare (pattern by Bonnie Hunter), because I thought it needed just a touch of the aqua between my inner and outer borders to “connect” the interior of the quilt with the binding (also in the aqua fabric). Because a flange doesn’t change the dimensions of the quilt at all, I didn’t need to worry about re-figuring pattern directions for borders.

Most flanges I’ve used were solid or read as solid fabrics, but as you can see, this one is a batik which adds interest as well as color.

Making a flange is super easy:

*Cut two strips of fabric slightly longer than the length of your quilt or area you want to emphasize and cut two strips slightly longer than the width of the working area. The width of your flange strips can be anywhere from 3/4 inch to 2 inches, depending on how much fabric you want showing.  (If you prefer to measure and cut the lengths precisely, you can. There is just no need to do so because the flange will not alter the size of your borders or blocks. Let’s assume the borders are already measured, pinned, and attached carefully to avoid wavy borders and excess fabric. See this post for more information of unruly borders.)

*Fold the strips lengthwise, wrong sides together and press.

*Align the edges of the flange with the edges of your quilt, border, or section. Pinning isn’t necessary, but may help keep the edges aligned. I usually just go unpinned for flange.

*Use a basting stitch and less than a 1/4 seam margin to attach the flange to the left and right sides. Trim excess from edges. In the same way, baste and trim the top and bottom flange onto your quilt.

*Continue with your quilt as you normally would. It’s that easy!

This quilt is an example of using a flange to “stop” the quilt prior to the binding. Without a flange, there wouldn’t be a defined edge. I didn’t want a completely dark binding to be in stark contrast  with the borders, so the flange was just the right amount of stopper needed.

Image of Quilt with Flange

This quilt has a dark flange between the outer border and the binding. Bella Piastrella by Karla Kiefner

When my friend Nancy and I design a quilt or church banner together we often consider the use of flanges – they’re just fun to do!

What technique  do you enjoy using in your quilts?

Please sign up to get an email when my next post goes live!

Follow me on Facebook, Instagram, Twitter, and Pinterest!


Best Tip for Paper Piecing!

This is my single best quilting tip for the paper-piecing technique.

There’s a reason I’m sharing my best tip. However you refer to it, paper piecing, foundation piecing, or foundation paper piecing, it gets me every time!

You may find this account a bit meladramatic…it certainly is tongue-in-cheek!

I suppose if I did paper piecing more often, I wouldn’t need to learn this every…single…time. But, I don’t. And, I do!

Let me start by saying that paper piecing is a very precise way to join fabrics. You will actually sew on the lines printed or drawn on paper. It’s quite a fantastic method for designs that call for perfection. I tend to not choose a lot of quilts that require the precision of paper piecing, so I usually need to do a refresher on the method when I do.

Image of best tip box of paper piecing
This is a partially completed project I inherited from my mother-in-law, Pat.

Since you sew by numbers, it’s the first and second pieces that are only a bit tricky.

Yes, I always have to start with a reminder of how to place the first piece (easy enough). But that’s not the tip!

Throughout my project (or at least the first ten sections), I have to remind myself of this one simple, yet crucial thing. Even though I try and try to guess the smallest (yet large-enough) piece of fabric to cover the next areas in numerical order, it eludes me. 

Over and over, I try to out-think the pattern, certain that my piece of fabric will coverage every bit of the pattern piece, plus seams, all the way to the edge of the design without using a crazy amount of fabric. But alas, again and again, it falls short. It may be tiny, but even a tiny speck of uncovered paper, is obvious when the fabric is missing.

Until I finally GIVE.

One must SUBMIT, I’ve learned, to paper piecing. One must be humbled to the Paper Piecing process and the excruciating fact that…tThere WILL BE wasted fabric! It is the nature of this beautiful beast.

Finally, here is my best tip for Paper Piecing:

Think big.

No, think BIG, really.

Now think really, really BIG!

Karla kiefner

Paper piecing is much more fun when you do!

In conclusion, that’s it! That’s all I’ve got. For me, that’s all it takes to make paper-piecing a fun way to spend an afternoon or MORE!

Image of Paper Piecing Kit
Star Lite Village by Judy Robinson, 1995

More Tips HERE

Hmmm, wonder if I should use paper piecing for one of my friend’s Round Robin borders?  Read the post about our guild Round Robin Challenge, “It’ll Be Fun,They Said” (click here) and stay tuned for updates on the challenge!

Begin to discover the fun technique of using BOTH beautiful sides of fabric HERE!

SHOP more than 45 patterns that use both sides!

What’s your favorite binding tool? Here’s mine at Favorite Binding Tool.

Read about quilt market here: To market, to market to buy a fat…

Six Favorites from Quilt Market

This is my first time to go to market and it is literally jaw-dropping!

Here are my six favorites from quilt market in St. Louis!

So I walk in, prepared, ready to take on the quilting world and figure it out. I take three steps inside the auditorium and promptly forget my name. My biggest ideas seem pint-size. Make that pea-sized!

Tula’s booth speaks for itself. Very professionally done, so the colorful artwork makes up for the lesser displays.

Initially, I visit all the booths, getting a feel for how market works. It seems the larger names and established companies prefer the inner sections.

Simple Simon and Company

Next in my quilt market favorites, is the booth shown above featuring their new line of fabric, “Just Add Sugar”. Due to the lighting in the auditorium, this photo doesn’t do this booth justice. So much work and detail went into this display that is hard to capture in a photo. For instance, this booth smelled delightfully of lemons!

Lori Holt’s Bee in My Bonnet

Lori’s blog was one of my first experiences with reading quilting blogs. I especially admire her consistency in colorations and design. I don’t recall an entire booth, but seeing this quilt up close was fun enough!

The “bag guy” at Shannon Fabrics

Next up was the “bag guy” at Shannon Fabrics. There are lots of freebies and fun stuff at market. I loved the Llama!

I could stand in her booth all day…just trying to soak up some Laura Heine magic! She designs spectacular quilts by combining interesting fabrics by collage.

Notice the almost wild combination of fabrics in Phoebee’s background? I think I gained the courage to combine them by standing in Laura’s booth!

Learn more about Phoebee and the start of using both sides of fabric HERE.

Pretty by Hand by Kristyne Czepuryk

Pretty by Hand

Soft and delicate, this booth is a pleasant and calming place to be. A new designer, Kristyne is friendly and encouraging.

To conclude, there are so many fabulous booths, it is hard to choose a favorite! Please keep in mind that the lighting of the convention center doesn’t do these pics justice! I encourage you to check out the websites of these companies (click the pictures for links) and see their beautiful work.  And if market is ever near you, GO! You’ll be glad you did!:)

Enjoy your quilting journey!

« Older posts Newer posts »